
Description of the Lab
This lab aims at getting you started properly for the PyRat course, by guiding through its installation, and through the provided files.
Additionally, we provide you some resources to practice Python programming on your own, if you feel like you need a refresher.
Day 1 – Installation & reminders
Setting up the PyRat environment
PyRat is a Python library, that can be installed with the standard library manager Pip.
It should work properly on Linux, Windows and OSX. However, we were not able to test on all system/hardware configuration. If you face any problem during installation, please call your teacher. It is essential that you start Episode 2 with a working software.
Now, follow the installation instructions at this link.
Python reminders
Python basics
Normally, before coming to this Lab, you should have read this article, which presents you the Python language, and gives a few elements of its syntax. If you haven’t read it already, please do.
Let’s solve some problems!
If you want to practice Python a bit to refresh your knowledge on the language, here is a cool website that proposes you some Python puzzles to solve. You can create an account and see how far you can go (but first read the next few paragraphs)!
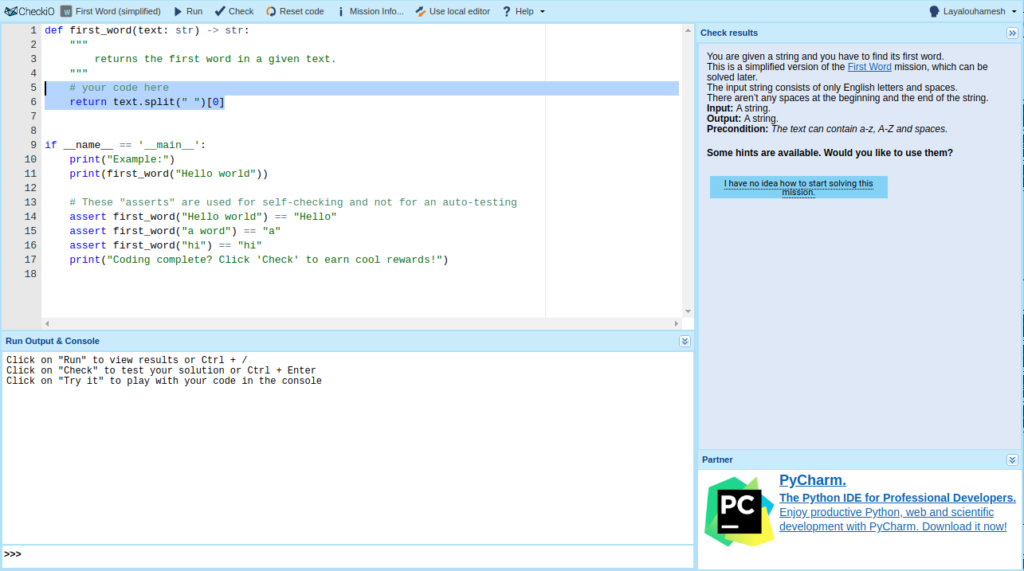
Typically, a CheckIO problem consists of an objective (e.g., « return the length of a given string »), a function to fill (where you write your solution), and a few tests to pass.
Working efficiently
Don’t stay blocked! When programming, you should acquire the following reflexes:
- Google for solutions! As an example, consider the problem of reversing the order of the letters in a word. Obviously, thousands of people have done that before and there should be an easy way of doing this in Python, but maybe you just don’t know the syntax or the function name that does that. A quick Google search for « python reverse string » should give you the solution;
- Read the doc! If you face an error message, check the Python documentation for it. In many cases, it will help you solve it;
- Ask people on the Discord server! Sometimes, you cannot find a solution online, or just don’t understand it. In that case, you should go to the Discord of the course and ask in the Question & Answers channel so that other students or teachers give you an explanation. Once the course is over, replace « Discord » with « Stack Overflow » and this remark remains valid.
Important! Asking someone or googling a problem is not cheating! For basic stuff like counting words, iterating over a structure, calling a complex function that does what you want… this is just the way to do! However, when you use a long and complex code you found online, which seems to solve the problem you are considering, you should:
- Check that you have the right to use it (some codes are subject to proprietary licenses);
- Understand what it does before using it (and if there are exceptions in its usage for instance);
- Put a comment in your code indicating where you found it.
Note that all the comments above also apply for functions obtained using AI-based tools like ChatGPT, or Copilot. In this course, we strongly encourage you to use existing codes, as it is what you will most probably do in your future career:
- Don’t reinvent the wheel;
- However, make sure that codes work as expected (see the unit testing section below).
Day 2 – Going through the files
First, read the doc!
Once the software is installed, we ask you to read the documentation, available at this link. In addition to some reminders of the presentation that was made to you by your teacher, you will also be guided in your discovery of the template.py and random_1.py files.
The tutorial.py file
Now that you know how PyRat programs work, let’s write some functions to manipulate the maze more conveniently. The tutorial.py (in the programs directory) provides you a few ones already. Let’s go through them.
The data structures
As you saw when reading the doc, the maze can be represented, either with a dictionary, or a numpy ndarray adjacency matrix, using the maze_representation option. Obviously, each of these representations has its own particularities, that you will study later in the course.
To make the choice of representation transparent, it is good practice to encapsulate its use within functions. Therefore, you can switch from one to the other easily without having to adapt numerous places in your code. Also, if you want to use a new representation, you can just update these encapsulating functions, and the rest of your code should work as before.
The provided functions
get_vertices:
The first functionality you want with a graph is to get its vertices. In the case of PyRat, we want to get the list of cells that are indeed accessible, i.e., the vertices between 0 and maze_width * maze_height - 1 that can be reached:
def get_vertices ( graph: Union[numpy.ndarray, Dict[int, Dict[int, int]]]
                 ) ->     List[int]:

    """
        Fuction to return the list of all vertices in a graph, except those with no neighbors.
        Here we propose an implementation for all types handled by the PyRat game.
        In:
            * graph: Graph on which to get the list of vertices.
        Out:
            * vertices: List of vertices in the graph.
    """

    # If "maze_representation" option is set to "dictionary"
    if isinstance(graph, dict):
        vertices = list(graph.keys())

    # If "maze_representation" option is set to "matrix"
    elif isinstance(graph, numpy.ndarray):
        vertices = list(graph.sum(axis=0).nonzero()[0])

    # Unhandled data type
    else:
        raise Exception("Unhandled graph type", type(graph))

    # Done
    return vertices
As you can see, the way to obtain these vertices is different for both representations:
- For the dictionary, the existing vertices are given by the keys of the dictionary;
- For the
numpy ndarray, they can be found by checking which row/column of the matrix has some non-0entries (a0at entrymaze[i, j]means that cellicannot access celljby performing an action.
get_neighbors
Another thing you want to do is to know where you can move, given your current location in the maze. To do so, you need to know the list of neighbors that can be accessed.
def get_neighbors ( vertex: int,
                    graph:  Union[numpy.ndarray, Dict[int, Dict[int, int]]]
                  ) ->      List[int]:

    """
        Fuction to return the list of neighbors of a given vertex.
        Here we propose an implementation for all types handled by the PyRat game.
        The function assumes that the vertex exists in the maze.
        It can be checked using for instance `assert vertex in get_vertices(graph)` but this takes time.
        In:
            * vertex: Vertex for which to compute the neighborhood.
            * graph:  Graph on which to get the neighborhood of the vertex.
        Out:
            * neighbors: List of vertices that are adjacent to the vertex in the graph.
    """

    # If "maze_representation" option is set to "dictionary"
    if isinstance(graph, dict):
        neighbors = list(graph[vertex].keys())

    # If "maze_representation" option is set to "matrix"
    elif isinstance(graph, numpy.ndarray):
        neighbors = graph[vertex].nonzero()[0].tolist()

    # Unhandled data type
    else:
        raise Exception("Unhandled graph type", type(graph))

    # Done
    return neighbors
Again, the behavior is different:
- For the dictionary representation, accessible neighbors are given by the keys of the dictionary associated to the key of your current location;
- For the matrix, it is the set of indices
jsuch thatmaze[i, j] != 0, whereiis your current location.
Interestingly, you can note that the function behave differently for both representations if you ask for the neighbor of a cell in interval [0, maze_width * maze_height - 1] which is not accessible:
- If using the dictionary representation, the function will try to acces a non-existing key in
maze, which will lead to Python raising an exception; - If using the matrix representation, the corresponding row will exist, and the function will just return an empty list.
This may seem problematic, as we defined this function to make the choice of a data structure transparent for the rest of our codes. We could solve this problem, for instance, by thecking if the list of vertices returned with the matrix representation is empty, and raisong an exception ourself. However, this would lead to a lot of useless computations, as this function is going to be called numerous times, and calling it for a non-accessible cell is not how we expect to use this function. A good practice is therefore to assume that this function will only be called for existing cells, and to guarantee a good behavior of the function in these cases only. This is called programming by contract.
get_weight
The next functionality we need with the maze, is to obtain the number of moves it takes to go from a cell to one of its neighbor.
def get_weight ( source: int,
                 target: int,
                 graph:  Union[numpy.ndarray, Dict[int, Dict[int, int]]]
               ) ->      List[int]:

    """
        Fuction to return the weight of the edge in the graph from the source to the target.
        Here we propose an implementation for all types handled by the PyRat game.
        The function assumes that both vertices exists in the maze and the target is a neighbor of the source.
        As above, it can be verified using `assert source in get_vertices(graph)` and `assert target in get_neighbors(source, graph)` but at some cost.
        In:
            * source: Source vertex in the graph.
            * target: Target vertex, assumed to be a neighbor of the source vertex in the graph.
            * graph:  Graph on which to get the weight from the source vertex to the target vertex.
        Out:
            * weight: Weight of the corresponding edge in the graph.
    """

    # If "maze_representation" option is set to "dictionary"
    if isinstance(graph, dict):
        weight = graph[source][target]

    # If "maze_representation" option is set to "matrix"
    elif isinstance(graph, numpy.ndarray):
        weight = graph[source, target]

    # Unhandled data type
    else:
        raise Exception("Unhandled graph type", type(graph))

    # Done
    return weight
Again, the behavior is different for both structures in unexpected usage situations:
- With a dictionary, trying to access a non-neighboring cell will result in an exception;
- With a matrix, it will just return a weight of
0.
Again, we will use the philosophy of design by contract, and assume that this function is only called with valid indices.
locations_to_action
The final function that is given to you allows you, given a cell and its neighbor, to determine which move you should return in your turn function.
def locations_to_action ( source:     int,
                          target:     int,
                          maze_width: int
                        ) ->          str:

    """
        Function to transform two locations into an action to reach target from the source.
        In:
            * source:     Vertex on which the player is.
            * target:     Vertex where the character wants to go.
            * maze_width: Width of the maze in number of cells.
        Out:
            * action: Name of the action to go from the source to the target.
    """

    # Convert indices in row, col pairs
    source_row = source // maze_width
    source_col = source % maze_width
    target_row = target // maze_width
    target_col = target % maze_width

    # Check difference to get direction
    difference = (target_row - source_row, target_col - source_col)
    if difference == (0, 0):
        action = "nothing"
    elif difference == (0, -1):
        action = "west"
    elif difference == (0, 1):
        action = "east"
    elif difference == (1, 0):
        action = "south"
    elif difference == (-1, 0):
        action = "north"
    else:
        raise Exception("Impossible move from", source, "to", target)
    return action
Here, the maze_width argument helps you converting the index of a cell into a pair (x, y) to be able to check if a cell is above or below another one.
preprocessing
As you can see, we have provided you a preprocessing function in the tutorial.py file. This will do nothing in the game, but we do that only to ask PyRat to generate a maze, so that we can call our functions and check quickly (through print commands) if they seem to work well. We will do it more formally in the next section.
Unit testing
What is it?
After writing a function that solves a problem, given some data, it is very important to test it, to be confident that it works as expected. Indeed, you are going to use this function extensively after. If it behaves wrong in some cases, then everything that uses will behave incorrectly too.
A standard approach to do this is to use unit tests. Such tests will ensure that, given some fixed inputs, the tested function returns the expected output. These inputs should be chosen to cover all possible execution threads of the function, i.e., standard cases, but also corner cases and error scenarios.
The tutorial_tests.py file
In the tests directory, you are provided a single script, that includes unit tests for the functions of the tutorial.py file described above. It uses a Python library made for unit testing, called unittest.
All tests in the file are performed on a single maze, that looks like that:
tutorial.py.Its encoding using both representations is given at the beginning of the file as follows:
# We define the graph structures that will be used for the tests
self.graph_dictionary = {0: {5: 1},
                         2: {3: 1, 7: 1},
                         3: {2: 1},
                         5: {0: 1, 6: 1, 10: 1},
                         6: {5: 1, 7: 1, 11: 8},
                         7: {2: 1, 3: 1, 6: 1, 8: 6},
                         8: {7: 6, 9: 9, 13: 1},
                         9: {8: 9},
                         10: {5: 1, 11: 1, 15: 9},
                         11: {6: 8, 10: 1, 16: 1},
                         13: {8: 1, 18: 6},
                         14: {19: 1},
                         15: {10: 9, 16: 4, 20: 1},
                         16: {11: 1, 15: 4, 17: 1, 21: 1},
                         17: {16: 1, 18: 5, 22: 1},
                         18: {13: 6, 17: 5, 19: 1, 23: 1},
                         19: {14: 1, 18: 1, 24: 1},
                         20: {15: 1},
                         21: {16: 1, 22: 1},
                         22: {17: 1, 21: 1},
                         23: {18: 1},
                         24: {19: 1}}

# Here is the same graph represented as an adjacency matrix
self.graph_matrix = numpy.array([[0, 0, 0, 0, 0, 1, 0, 0, 0, 0, 0, 0, 0, 0, 0, 0, 0, 0, 0, 0, 0, 0, 0, 0, 0],
                                 [0, 0, 0, 0, 0, 0, 0, 0, 0, 0, 0, 0, 0, 0, 0, 0, 0, 0, 0, 0, 0, 0, 0, 0, 0],
                                 [0, 0, 0, 1, 0, 0, 0, 1, 0, 0, 0, 0, 0, 0, 0, 0, 0, 0, 0, 0, 0, 0, 0, 0, 0],
                                 [0, 0, 1, 0, 0, 0, 0, 0, 0, 0, 0, 0, 0, 0, 0, 0, 0, 0, 0, 0, 0, 0, 0, 0, 0],
                                 [0, 0, 0, 0, 0, 0, 0, 0, 0, 0, 0, 0, 0, 0, 0, 0, 0, 0, 0, 0, 0, 0, 0, 0, 0],
                                 [1, 0, 0, 0, 0, 0, 1, 0, 0, 0, 1, 0, 0, 0, 0, 0, 0, 0, 0, 0, 0, 0, 0, 0, 0],
                                 [0, 0, 0, 0, 0, 1, 0, 1, 0, 0, 0, 8, 0, 0, 0, 0, 0, 0, 0, 0, 0, 0, 0, 0, 0],
                                 [0, 0, 1, 0, 0, 0, 1, 0, 6, 0, 0, 0, 0, 0, 0, 0, 0, 0, 0, 0, 0, 0, 0, 0, 0],
                                 [0, 0, 0, 0, 0, 0, 0, 6, 0, 9, 0, 0, 0, 1, 0, 0, 0, 0, 0, 0, 0, 0, 0, 0, 0],
                                 [0, 0, 0, 0, 0, 0, 0, 0, 9, 0, 0, 0, 0, 0, 0, 0, 0, 0, 0, 0, 0, 0, 0, 0, 0],
                                 [0, 0, 0, 0, 0, 1, 0, 0, 0, 0, 0, 1, 0, 0, 0, 9, 0, 0, 0, 0, 0, 0, 0, 0, 0],
                                 [0, 0, 0, 0, 0, 0, 8, 0, 0, 0, 1, 0, 0, 0, 0, 0, 1, 0, 0, 0, 0, 0, 0, 0, 0],
                                 [0, 0, 0, 0, 0, 0, 0, 0, 0, 0, 0, 0, 0, 0, 0, 0, 0, 1, 0, 0, 0, 0, 0, 0, 0],
                                 [0, 0, 0, 0, 0, 0, 0, 0, 1, 0, 0, 0, 0, 0, 0, 0, 0, 0, 6, 0, 0, 0, 0, 0, 0],
                                 [0, 0, 0, 0, 0, 0, 0, 0, 0, 0, 0, 0, 0, 0, 0, 0, 0, 0, 0, 1, 0, 0, 0, 0, 0],
                                 [0, 0, 0, 0, 0, 0, 0, 0, 0, 0, 9, 0, 0, 0, 0, 0, 4, 0, 0, 0, 1, 0, 0, 0, 0],
                                 [0, 0, 0, 0, 0, 0, 0, 0, 0, 0, 0, 1, 0, 0, 0, 4, 0, 1, 0, 0, 0, 1, 0, 0, 0],
                                 [0, 0, 0, 0, 0, 0, 0, 0, 0, 0, 0, 0, 0, 0, 0, 0, 1, 0, 5, 0, 0, 0, 1, 0, 0],
                                 [0, 0, 0, 0, 0, 0, 0, 0, 0, 0, 0, 0, 0, 6, 0, 0, 0, 5, 0, 1, 0, 0, 0, 1, 0],
                                 [0, 0, 0, 0, 0, 0, 0, 0, 0, 0, 0, 0, 0, 0, 1, 0, 0, 0, 1, 0, 0, 0, 0, 0, 1],
                                 [0, 0, 0, 0, 0, 0, 0, 0, 0, 0, 0, 0, 0, 0, 0, 1, 0, 0, 0, 0, 0, 0, 0, 0, 0],
                                 [0, 0, 0, 0, 0, 0, 0, 0, 0, 0, 0, 0, 0, 0, 0, 0, 1, 0, 0, 0, 0, 0, 1, 0, 0],
                                 [0, 0, 0, 0, 0, 0, 0, 0, 0, 0, 0, 0, 0, 0, 0, 0, 0, 0, 0, 0, 0, 1, 0, 0, 0],
                                 [0, 0, 0, 0, 0, 0, 0, 0, 0, 0, 0, 0, 0, 0, 0, 0, 0, 0, 1, 0, 0, 0, 0, 0, 0],
                                 [0, 0, 0, 0, 0, 0, 0, 0, 0, 0, 0, 0, 0, 0, 0, 0, 0, 0, 0, 1, 0, 0, 0, 0, 0]])
Ideally, you should test your functions for multiple mazes, that exhibit multiple particularities, to make sure that your functions work for various game configurations. Let’s have a look at the tests done for each function.
test_get_vertices
Here, we want to make sure that the function returns the correct list of vertices. It should return all vertices in [0, 24] except 1, 4 and 12 since the cells are not accessible.
def test_get_vertices ( self: Self
                      ) ->    None:

    """
        This function tests the function "get_vertices" of the file "tutorial.py".
        It checks that the function returns the correct list of vertices for both graph structures.
        In:
            * self: Reference to the current object.
        Out:
            * None.
    """

    # We test the function for both graph structures
    for graph in [self.graph_dictionary, self.graph_matrix]:

        # We check that the function returns the correct list of vertices
        self.assertEqual(get_vertices(graph), [0, 2, 3, 5, 6, 7, 8, 9, 10, 11, 13, 14, 15, 16, 17, 18, 19, 20, 21, 22, 23, 24])
test_get_neighbors
Now, let us check if we get the correct neighbors for some cells. Here we have chosen to test for a few cells with a different count of neighbors.
Note that standard use tests are the same for both structures. However, as mentioned earlier, the function has a different behavior for the structures for use cases that are not normal. We have included this in the tests for illustration, and to make sure that these wrong cases indeed raise an erroror return an empty list.
Remember that in your tests, it is also good to test error cases, to make sure that they lead to errors.
def test_get_neighbors ( self: Self
                       ) ->    None:

    """
        This function tests the function "get_neighbors" of the file "tutorial.py".
        It checks that the function returns the correct list of neighbors for both graph structures.
        In:
            * self: Reference to the current object.
        Out:
            * None.
    """

    # We test the function for both graph structures
    for graph in [self.graph_dictionary, self.graph_matrix]:

        # We check that the function returns the correct list of neighbors for standard cases
        self.assertEqual(get_neighbors(9, graph), [8])
        self.assertEqual(get_neighbors(2, graph), [3, 7])
        self.assertEqual(get_neighbors(8, graph), [7, 9, 13])
        self.assertEqual(get_neighbors(16, graph), [11, 15, 17, 21])

        # The function should raise an exception if the vertex is not in the graph
        self.assertRaises(Exception, get_neighbors, 25, graph)

    # Note the different behavior between structures when not using the function correctly (cf. comments regarding assertions in function definition)
    self.assertRaises(Exception, get_neighbors, 1, self.graph_dictionary)
    self.assertEqual(get_neighbors(1, self.graph_matrix), [])
test_get_weight
Let us now check if we obtain the expeted weight. We have here tested for two different weights, as well as for error cases (disconnected cell, or out of bounds).
def test_get_weight ( self: Self
                    ) ->    None:

    """
        This function tests the function "get_weight" of the file "tutorial.py".
        It checks that the function returns the correct weight for both graph structures.
        In:
            * self: Reference to the current object.
        Out:
            * None.
    """

    # We test the function for both graph structures
    for graph in [self.graph_dictionary, self.graph_matrix]:

        # We check that the function returns the correct weight for standard cases
        self.assertEqual(get_weight(9, 8, graph), 9)
        self.assertEqual(get_weight(17, 22, graph), 1)

        # The function should raise an exception if the vertex is not in the graph
        self.assertRaises(Exception, get_weight, 24, 25, graph)

    # Note the different behavior between structures when not using the function correctly (cf. comments regarding assertions in function definition)
    self.assertRaises(Exception, get_weight, 0, 0, self.graph_dictionary)
    self.assertRaises(Exception, get_weight, 0, 1, self.graph_dictionary)
    self.assertEqual(get_weight(0, 0, self.graph_matrix), 0)
    self.assertEqual(get_weight(0, 1, self.graph_matrix), 0)
test_locations_to_action
Finally, let’s check that we obtain the correct firection, given some fixed inputs.
def test_locations_to_action ( self: Self
                             ) ->    None:

    """
        This function tests the function "locations_to_action" of the file "tutorial.py".
        It checks that the function returns the correct action.
        In:
            * self: Reference to the current object.
        Out:
            * None.
    """

    # We check that the function returns the correct action for standard cases
    self.assertEqual(locations_to_action(16, 11, self.maze_width), "north")
    self.assertEqual(locations_to_action(16, 15, self.maze_width), "west")
    self.assertEqual(locations_to_action(16, 17, self.maze_width), "east")
    self.assertEqual(locations_to_action(16, 21, self.maze_width), "south")
    self.assertEqual(locations_to_action(16, 16, self.maze_width), "nothing")

    # The function should raise an exception if the locations are not adjacent
    self.assertRaises(Exception, locations_to_action, 16, 20, self.maze_width)
Run the script
Let us run the tutorial_tests.py script now. We obtain the following output:
This function tests the function "get_neighbors" of the file "tutorial.py". ... ok
test_get_vertices (__main__.TestsTutorial)
This function tests the function "get_vertices" of the file "tutorial.py". ... ok
test_get_weight (__main__.TestsTutorial)
This function tests the function "get_weight" of the file "tutorial.py". ... ok
test_locations_to_action (__main__.TestsTutorial)
This function tests the function "locations_to_action" of the file "tutorial.py". ... ok

----------------------------------------------------------------------
Ran 4 tests in 0.000s

OK
Let’s change test_get_vertices to introduce an error, for illustration:
def test_get_vertices ( self: Self
                      ) ->    None:

    ...
    self.assertEqual(get_vertices(graph), [21, 22, 23, 24])
Here is the obtained output:
test_get_neighbors (__main__.TestsTutorial)
This function tests the function "get_neighbors" of the file "tutorial.py". ... ok
test_get_vertices (__main__.TestsTutorial)
This function tests the function "get_vertices" of the file "tutorial.py". ... FAIL
test_get_weight (__main__.TestsTutorial)
This function tests the function "get_weight" of the file "tutorial.py". ... ok
test_locations_to_action (__main__.TestsTutorial)
This function tests the function "locations_to_action" of the file "tutorial.py". ... ok

======================================================================
FAIL: test_get_vertices (__main__.TestsTutorial)
This function tests the function "get_vertices" of the file "tutorial.py".
----------------------------------------------------------------------
Traceback (most recent call last):
  File ".../pyrat_workspace/tests/tutorial_tests.py", line 155, in test_get_vertices
    self.assertEqual(get_vertices(graph), [21, 22, 23, 24])
AssertionError: Lists differ: [0, 2, 3, 5, 6, 7, 8, 9, 10, 11, 13, 14, 15, 16, 17, 18, 19, 20, 21, 22, 23, 24] != [21, 22, 23, 24]

First differing element 0:
0
21

First list contains 18 additional elements.
First extra element 4:
6

- [0, 2, 3, 5, 6, 7, 8, 9, 10, 11, 13, 14, 15, 16, 17, 18, 19, 20, 21, 22, 23, 24]
+ [21, 22, 23, 24]

----------------------------------------------------------------------
Ran 4 tests in 0.001s

FAILED (failures=1)
Conclusions
When all tests are passed succesfully, we can be pretty confident that the functions have been coded well and do what they should. However, it doesn’t mean that the function works 100%. Here are some possible sources of error:
- You forgot some execution cases to test;
- Your script uses random numbers and you cannot test all situations;
- There are side effects that may affect your tests (e.g., an overflow on a variable)…
Still, making unit tests is very important to validate your functions. Also, remember that if your functions are small blocks of code, they are easier to test and to validate, so don’t hesitate to decompose your code into small elementary bricks!
The provided scripts
Finally, in addition to the programs and tests, you are also given a few scripts with PyRat, in the stats directory. Basically, these scripts run many games, and format the output statistics to draw some conclusions.
Let’s focus on the script called compare_needed_actions.py. This script performs 500 games per player {random_1.py, random_2.py and random_3.py}, which are the scripts you will study in Episode 2. It will then keep all output stats in memory to produce analyses at the end.
Informal analysis
First, the program compares the average time that is required by each program to compute a decision.
Program random_1 requires on average 1089.758 actions,
with an average preprocessing duration of 3.0001680000000073e-06 seconds,
and an average turn duration of 5.141798218164616e-06 seconds

Program random_2 requires on average 754.034 actions,
with an average preprocessing duration of 2.518185999999989e-06 seconds,
and an average turn duration of 6.986329532242071e-06 seconds

Program random_3 requires on average 279.304 actions,
with an average preprocessing duration of 6.639784000000003e-06 seconds,
and an average turn duration of 1.1504539459115793e-05 seconds
Here, we observe that there seems to be a large difference in the number of actions required to complete the game (with 1 piece of cheese). However, the required time is very low for all three programs.
Formal analysis
The previous analysis makes us think that random_3.py is better than random_2.py, which is better than random_1.py. But is it really the case? To make sure that these conclusions hold, i.e., that random_3.py is significantly better than random_2.py, which is significantly better than random_1.py, we need more formal statistical tests.
To do this, the field of statistics provides us a collection of tests. Such tests aim at answering questions like « Is my list of values the realization of a Gaussian process? », « Are these two lists of values realizations of the same distribution? », etc. Here, we are going to use a Mann-Whitney U test. This test will indicate us if two lists of values are realizations of the same distribution or not.
Why is it useful in our case? For comparing random_1.py and random_2.py, we have two lists of 500 values each: a first one containing the number of moves needed per game to complete it for random_1.py, and a second one for random_2.py. Here, we want to answer the following question (more formally, we say reject the null hypothesis): « Does random_1.py take more moves than random_2.py to complete a game? »
A statistical test will provide us a p-value, which you can understand for now as an indicator of how sure the test is of its result. The lower the p-value, the more confident it is. In many situations, we consider the test to be significant if p-value < 0.05. However in applications that are more critical (health, security…), it is frequent to lower this threshold to lower values (e.g., 0.001).
In our application, the test gives us the following output:
Mann-Whitney U test between turns of program random_1 and of program random_2 :
MannwhitneyuResult(statistic=143368.0, pvalue=5.767839888538634e-05)

Mann-Whitney U test between turns of program random_1 and of program random_3 :
MannwhitneyuResult(statistic=189672.0, pvalue=1.5792746543711826e-45)

Mann-Whitney U test between turns of program random_2 and of program random_3 :
MannwhitneyuResult(statistic=175793.0, pvalue=9.742745894951794e-29)
As we can see, we can be pretty confident that random_3.py is better than random_2.py, which is better than random_1.py, thanks to statistical significance. Besides, we now have statistical arguments to affirm this, which is a very solid argument. If you think of this in your future job, you may want to justify why your client should buy your software rather than the one of your concurrent. If you can show that you are better with statistical guarantees, this is a great thing.
One more thing: statistical test confidence generally depends on the sample size. Here we have performed 500 games per program, so we have a good estimate of the distribution of the number of actions to perform. If we were to do the same test again with only 10 games, we would obtain the following output:
Program random_1 requires on average 1186.0 actions,
with an average preprocessing duration of 3.39810000000002e-06 seconds,
and an average turn duration of 7.271149868825254e-06 seconds

Program random_2 requires on average 735.8 actions,
with an average preprocessing duration of 2.400500000000012e-06 seconds,
and an average turn duration of 1.228830395502863e-05 seconds

Program random_3 requires on average 168.0 actions,
with an average preprocessing duration of 1.1088299999999956e-05 seconds,
and an average turn duration of 1.589236807817576e-05 seconds

Mann-Whitney U test between turns of program random_1 and of program random_2 :
MannwhitneyuResult(statistic=51.0, pvalue=0.9698499769931556)

Mann-Whitney U test between turns of program random_1 and of program random_3 :
MannwhitneyuResult(statistic=82.0, pvalue=0.017257456083119765)

Mann-Whitney U test between turns of program random_2 and of program random_3 :
MannwhitneyuResult(statistic=85.0, pvalue=0.009108496398030965)
While the informal analysis seems to give the same results as before, the Mann-Whitney U test shows a large p-value. Therefore we are not able to conclude with statistical significance anymore that random_2.py is better than random_1.py.
Why is it the case? The informal analysis tells us that the first list has an average value of 1186, where the second one has an average value of 735.8. This seems different, but maybe this is just an misperception due to 10 games being too small? Indeed, let’s imagine we flip a (balanced) coin 3 times, and obtain [tails, tails, tails]. Then we flip it again and obtain [heads, heads, tails]. A bad analysis would conclude that my flipping process was different, since in the first list I would obtain 100% of tails, and only 33.3% in the second list. However, it is pretty obvious that if I increase the size of my lists by flipping coins again, I would converge to 50% for both lists.
You will learn about statistical tests and the notion of p-value more thoroughly in your statistics classes later in your cursus.
If you are more interested in this already, you can check this YouTube channel, that contains pretty good introductory videos to statistics. Here are in particular two related videos:
Visual analysis
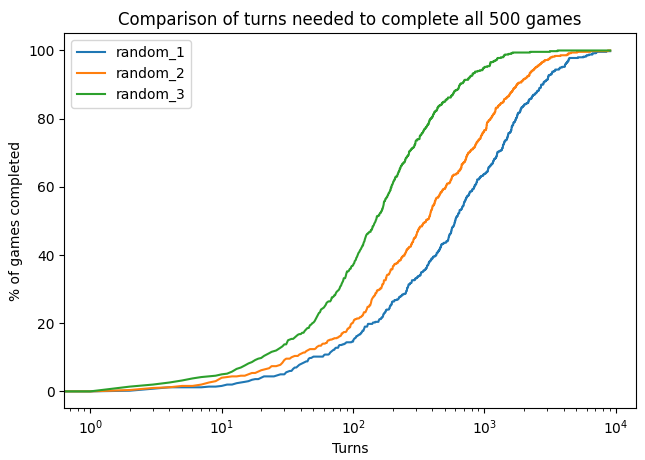
Finally, the script generates a visual representation of the cumulative of the number of moves necessary to complete the games. The lefter, the better.
It is always nice to have visual representations of your results, as it proposes an intuitive visualization of them. Here, for instance, we see that the gap between the performance of random_2.py and random_3.py is larger than the gap between random_1.py and random_2.py. If you compare with the p-values of the Mann-Whitney U tests above (for the 500 games), you will observe that there is a lower p-value in the first case, which reflects this.
Concluding words
This is a simple example of what you can do with the script that we gave you. Do not hesitate to write your own scripts to analyze the results you get, and to show, with statistical guarantees, a behavior or another!